 Save to Pinterest
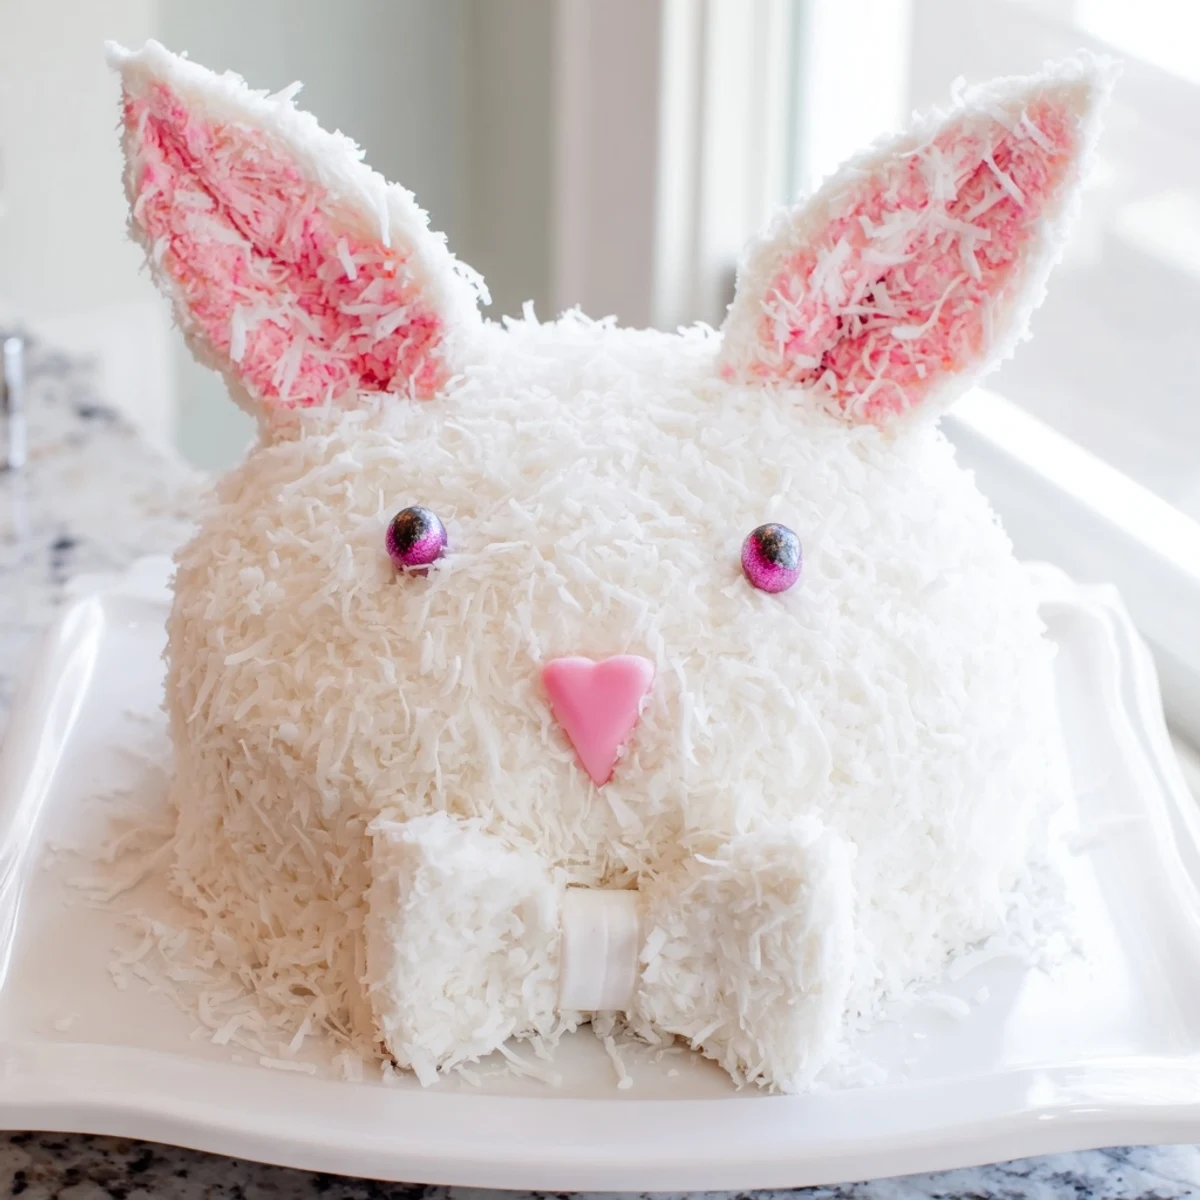
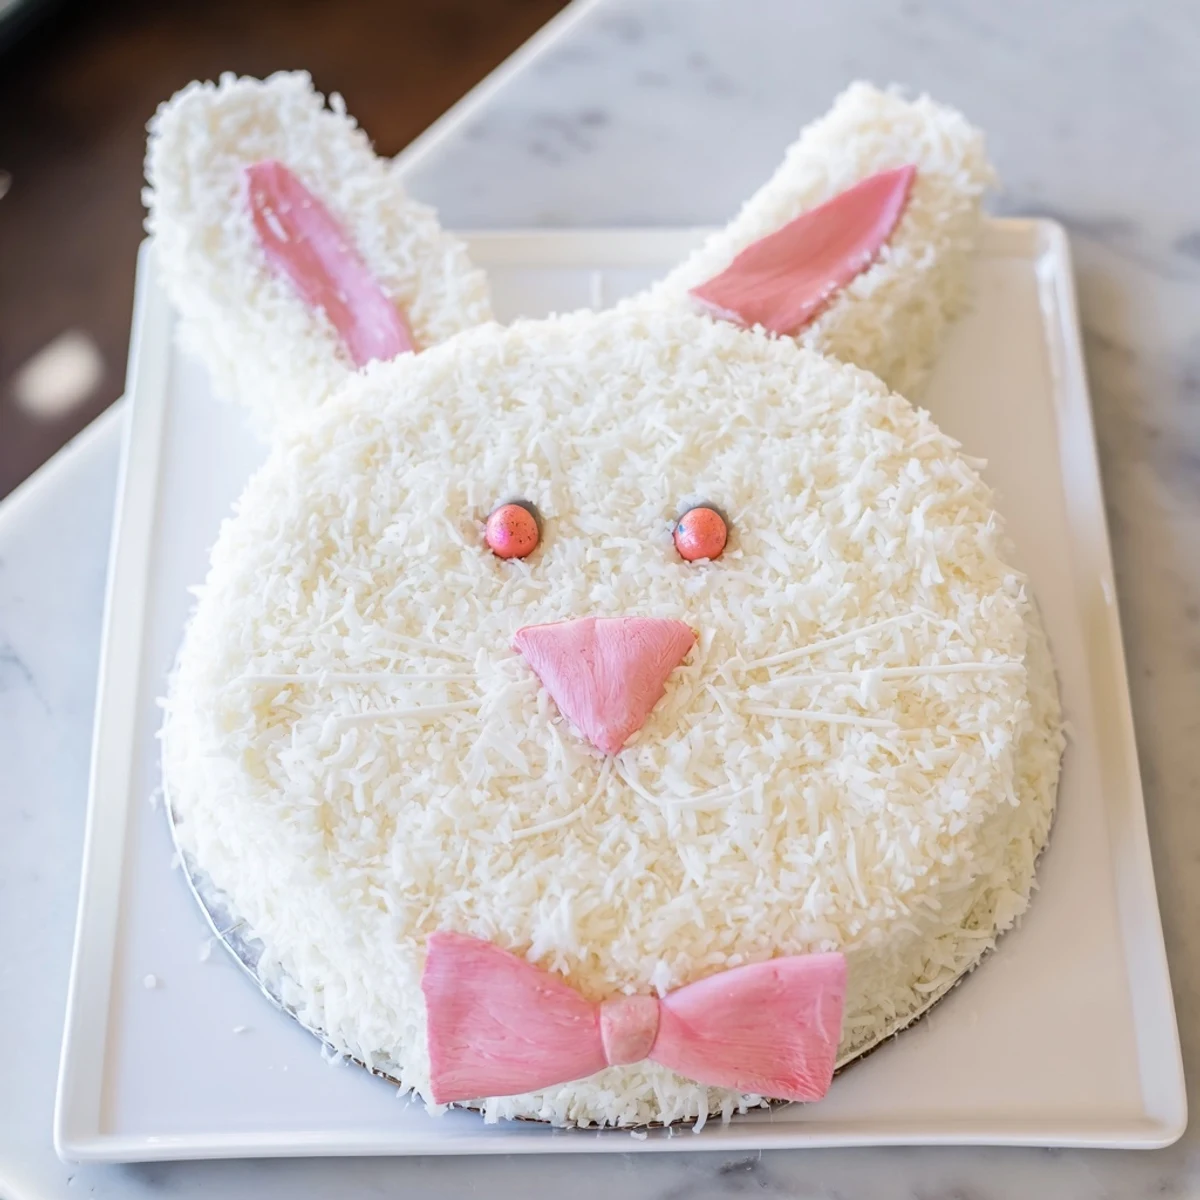
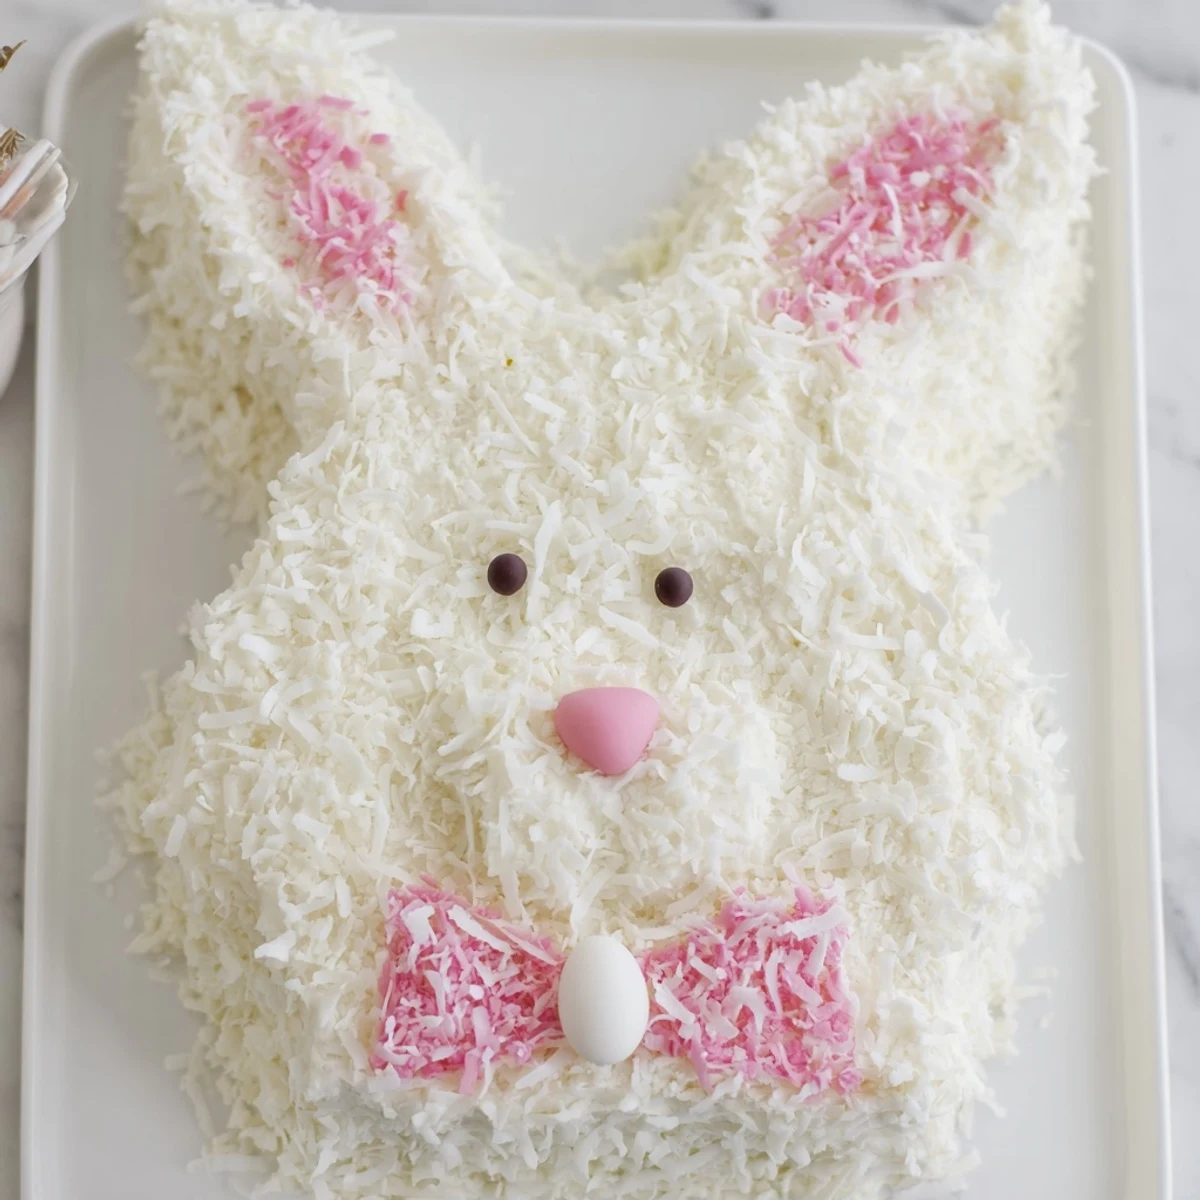
 This charming bunny-shaped dessert brings whimsy to any Easter or spring celebration. Two rounds of moist vanilla cake form an adorable bunny face with floppy ears and a bow tie. The entire creation gets coated in creamy vanilla buttercream and rolled in shredded coconut for a fluffy fur effect. Pink-tinted coconut creates the inner ears, while candy details bring the bunny to life with eyes and nose. Whether using fondant, marshmallows, or simple candies for decorations, this delightful centerpiece takes about an hour from start to finish and yields twelve servings of festive spring sweetness.
The year my youngest turned four, she announced that bunnies were her entire world. I spent three nights sketching cake shapes until 2am, terrified I would somehow mess up something so important. When she walked into the kitchen on Easter morning and actually gasped, I forgot about the flour coating my pajamas and the coconut ground into the floorboards. Sometimes the most ridiculous kitchen projects become the ones we talk about for years afterward.
My sister in law took one look at the cake pieces scattered across my counter and asked if I was having a breakdown. She helped me arrange the bow tie just right while sipping her coffee, and later admitted that shaping rabbit ears was actually kind of therapeutic. Now she makes this same cake every spring, though she still calls me to ask which piece is supposed to be the face.
Ingredients
- 2¼ cups all-purpose flour: The backbone of your cake, measured carefully because too much flour turns cake into something resembling a dense kitchen sponge
- 1½ tsp baking powder and ½ tsp baking soda: The lifting team that makes your bunny face rise properly instead of staring sadly up from the pan
- ½ tsp salt: A tiny pinch that balances all the sugar and makes people ask what your secret ingredient is
- 1 cup granulated sugar: Sweetness that browns beautifully on the edges while keeping the center tender and moist
- ½ cup unsalted butter: Use actual softened butter, not melted, because the air you beat into it is what makes the cake texture dreamy
- 3 large eggs: Room temperature eggs incorporate better and prevent that curdled looking batter that makes you panic unnecessarily
- 1 cup whole milk: Full fat milk creates the tenderest crumb, though nobody will judge you if that is what you happen to have in the fridge
- 2 tsp vanilla extract: Pure vanilla makes a noticeable difference in a cake with this few ingredients
- 1 cup unsalted butter for frosting: This needs to be genuinely soft but not melting, or your buttercream will turn into a sad puddle
- 4 cups powdered sugar: Sifting this first prevents those tiny lumpy white dots in your otherwise smooth frosting
- 2–3 tbsp milk: Add this one tablespoon at a time until you reach spreading consistency, because you can always add more but you cannot take it back
- 1 tsp vanilla extract: The same vanilla you used in the cake ties everything together beautifully
- Pinch of salt: Just enough to cut through all that sugar and keep the frosting from tasting cloyingly sweet
- 2 cups shredded sweetened coconut: Press this gently into the frosting so it actually sticks instead of sliding right off onto your serving platter
- Pink food coloring: A single drop goes shockingly far when coloring coconut for those inner ear details
- Jelly beans or mini candies: Pick whatever colors make you happy, though I have found that pink noses always look the most bunny-like
- Pink and white fondant or marshmallows: Fondant gives you cleaner ear shapes, but marshmallows are easier and nobody cares about perfection on a cake covered in coconut fur
Instructions
- Get your oven ready:
- Preheat to 350°F and grease those cake pans like your reputation depends on it, getting into every corner and crevice
- Mix your dry ingredients together:
- Whisk the flour, baking powder, baking soda, and salt in a medium bowl so you do not end up with bitter baking soda pockets in your finished cake
- Make the magic happen:
- Cream that butter and sugar until it looks pale and fluffy, then beat in eggs one at a time before adding vanilla for the most aromatic batter
- Combine everything carefully:
- Alternate adding flour mixture and milk, starting and ending with flour, and stop mixing the second you see the last streak of flour disappear
- Bake your rounds:
- Divide batter evenly and bake for about 23 minutes until a toothpick comes out clean, but do not overbake or your bunny face will be dry and sad
- Let them cool completely:
- Give them 10 minutes in the pans, then turn them out onto wire racks because warm cake melts frosting into a frustrating slide-off mess
- Make the fluffy frosting:
- Beat butter until smooth, then gradually add powdered sugar with vanilla, salt, and just enough milk to make it spreadable without being runny
- Sculpt your bunny parts:
- Leave one cake whole for the face, cut the second into two oval ears, and shape the remaining center into a bow tie that looks reasonably symmetrical
- Arrange your masterpiece:
- Position the face, ears, and bow tie on your serving tray before frosting, moving pieces around until the bunny shape makes you happy
- Add the crumb coat:
- Spread a thin layer of frosting over everything and chill for 20 minutes because this step is the difference between crumby frosting and professional looking results
- Give your bunny some fur:
- Frost the cake completely and press shredded coconut all over, working in sections and pressing gently so it actually adheres to the surface
- Add those precious pink details:
- Tint a handful of coconut with pink food coloring and carefully press it into the inner ear sections for that adorable cotton-tail look
- Bring your bunny to life:
- Use fondant or marshmallows for ears, then add jelly bean eyes, a pink nose, and any whiskers or decorations that make you smile
 Save to Pinterest
 My daughter helped press the pink coconut onto the ears and managed to get more on her forehead than on the cake. The photos from that Easter show her with pink-speckled bangs, grinning like she just performed actual magic. That is the thing about making food shaped like adorable animals, the memories stick around longer than the cake itself.
Making This Cake Your Own
Chocolate cake works beautifully here if that is what your family prefers, and the coconut fur creates such a pretty contrast against dark cake layers. I have made this with lemon cake for spring brunches and red velvet for Valentine's Day, because bunny shaped desserts are not just for Easter anymore.
Serving and Storage
This cake is definitely a conversation starter, so serve it on your largest platter where people can gather around and admire your handiwork before cutting in. Leftovers keep surprisingly well covered at room temperature for a couple days, though in my house the ears usually disappear first.
Kid Friendly Decorating Ideas
Little hands can help press coconut onto the frosting and arrange the candy face features without much supervision. The decorating process becomes half the fun when children are involved.
- Set up a decorating station with various candies and let kids design their own bunny faces
- Use licorice strings for whiskers that actually stay in place and look delightfully authentic
- Keep extra coconut handy because some will inevitably end up on the floor rather than the cake
 Save to Pinterest
 There is something genuinely joyful about cutting into a cake shaped like a bunny and watching people light up before they even take a bite. May your kitchen be filled with flour, laughter, and at least one slightly lopsided but thoroughly loved dessert this spring.
Recipe FAQs
- → How do I cut the cake into bunny shapes?
-
Leave one 8-inch round cake whole for the bunny's face. Cut the second round into two equal ovals for the ears, then trim the remaining center portion into a bow tie shape. Arrange all pieces on a large serving tray before frosting to ensure proper placement.
- → Can I make this cake ahead of time?
-
Yes, bake the cake layers up to two days in advance and store them wrapped tightly at room temperature. The frosted and decorated bunny keeps well for two days at room temperature or up to four days refrigerated, though the coconut may soften slightly over time.
- → What if I don't have fondant for the decorations?
-
Marshmallows work beautifully for creating the bunny's inner ears, or simply use the pink-tinted coconut method described in the instructions. For facial features, jelly beans, M&Ms, or other small candies make excellent eyes and noses without requiring fondant work.
- → Can I use chocolate cake instead of vanilla?
-
Absolutely! Chocolate cake pairs wonderfully with coconut and creates a striking contrast with the white coconut 'fur.' Simply prepare your favorite chocolate cake batter in the same quantities and follow the shaping and decorating instructions exactly.
- → How much frosting do I need for this design?
-
The recipe provides enough buttercream for a full coating plus the crumb coat layer. If you prefer a thicker frosting application or want to add extra decorative piping, consider preparing 1.5 times the frosting amount. The coconut coverage helps mask any imperfections in the frosting layer.
- → What's the best way to transport a bunny cake?
-
Assemble and decorate the bunny directly on your serving platter or a sturdy cake board covered in foil. For transport, place the platter on a non-slip mat in your car's trunk or flattest surface. The coconut coating actually helps protect the frosting during travel, though avoid covering with plastic wrap as it will stick to the decorations.
